Gifts

DIY fabric name bunting – part 2

Fabric birthday bunting

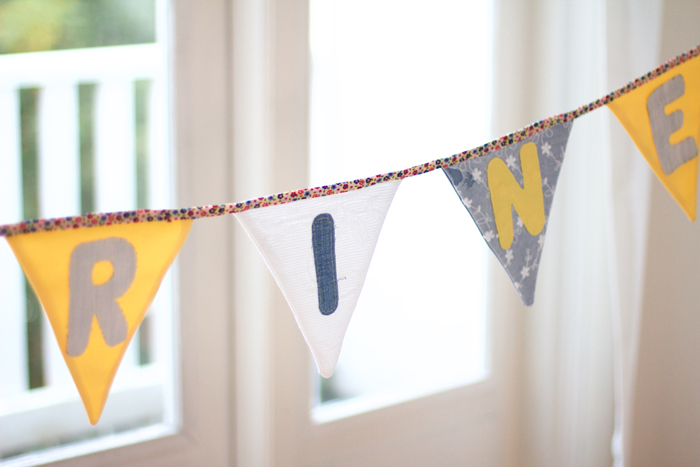
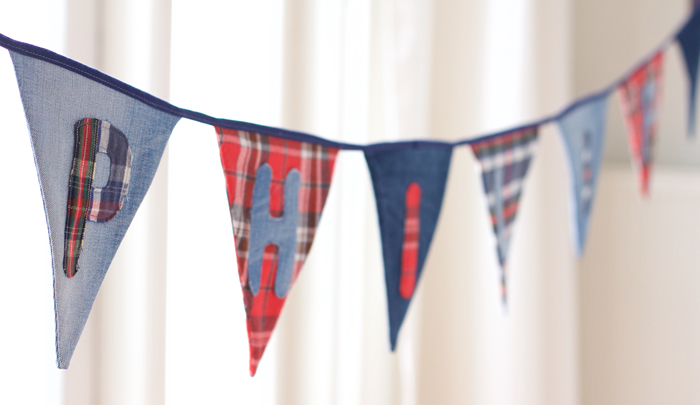
I hope you all enjoyed my latest post on how to make your own fabric bunting for a very special person (my little nephew Philip). Well get ready for part two! This time I made a fabric bunting for my beautiful niece, Florine, who turned 3 last month. These great baby blue eyes deserve something really memorable don’t you think?

Vintage fabrics

Every sewing mission starts with the search for the perfect fabrics. As mentioned in the previous DIY fabric name bunting tutorial, I prefer vintage fabrics for a project like this, because it’s a clever way to include wonderful memories and save money at the same time. So quickly, my closet was turned inside out, left over pieces of sewing projects were flying around, and once neatly ordered stacks were turned to big messy piles.

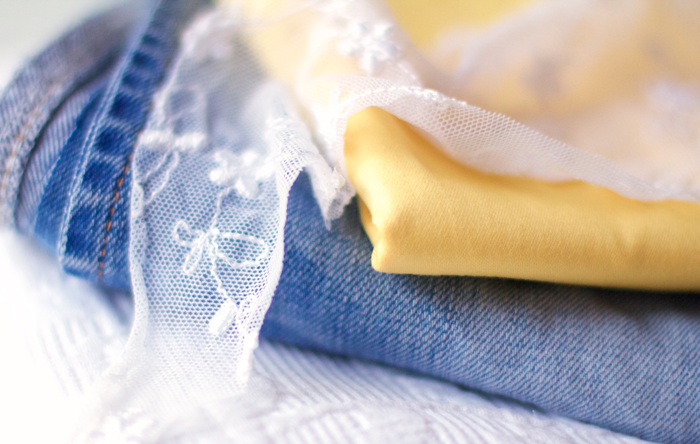
Cute but not too girly

I was looking for something cute but not too girly. I’m not really into the whole everything-needs-to-be-pink-for-a-babygirl mindset. Eventually I found this really nice old pillowcase and lace top. I thought it would be nice to combine the girly lace with boyish denim and add a splash of bright yellow. To finish it all off I bought bias tape with flowers on the Albert Cuyp market in Amsterdam, which is only a few streets from where I live, lucky me. I must say, the result is very much ‘Florine’. For people who don’t know her, let the pictures speak for themselves!

Florine

DIY fabric bunting

Birthday bunting DIY

DIY fabric bunting girlPattern fabric bunting
Name banner girl

2016-10-30T12:23:05+01:00January 10th, 2016|2 Comments

DIY fabric name bunting – part 1

Fabric banner

My nephew Philip turned one year old last week, so I started thinking about a nice gift. Preferably something memorable, that could be used over the years. Inspired by my collegae and lovely friend Jet-Anne, who sells the greatest handmade bags and buntings in her webshop Vleugje van Toen, I started dreaming away. When searching Pinterest a world of fabric name buntings opened, which doesn’t surprise me really, since they are so easy to make and fun to give. Ok, here we go! 

Vintage fabric

When Daan was sorting out his closet the other day, I was just in time to save some really nice fabrics. Even though it felt a bit weird to cut into his old jeans and shirts, the result was amazing! The vintage look just made the fabric bunting all the more cute and suitable for a babyboy. Bonus: recycling is good for the environment and low budget. Who doesn’t have scraps of fabric or old clothes lying around that don’t get much use any more? Go wild!

Verjaardagsslinger-stof

Stoffen verjaardagsslinger

Memories on a ribbon

If you start recycling, why not give it something special? It might be fun to gather fabrics that remind you, are the person that you are making the bunting for, of lovely times. A piece from your favourite dress when you were little, the lining from your crib, or that old blouse that you can’t seem to say goodbye to…  Sweet memories will be hanging in your living room soon.

My little niece Florine turns 3 in december, so stay tuned for some birthday girl bunting inspiration!

Stoffen vlaggetjes maken

Slinger verjaardag stof

[print_this]

DIY fabric name bunting

My bunting has ten little flags in a row. Six for the name Philip, and an extra two on each end.

Materials

  • Two rolls of bias tape (4 to 6 meters in total, depending on the length of the name. Make sure you leave enough tape at the ends so you can hang up the bunting nicely.
  • Fabric for the flags and the letters (for each flag you need two triangles of fabric, download the free bunting pattern here).
  • Yarn in a matching color, or a fun contrasting one.

Instructions

1. Determine the length of the ribbon. Stitch the bias tape together at the ends, so that you get one long ribbon. Fold in half and iron.

2. Cut the triangles for your bunting and decide on the order of your flags.

3. Determine on which flags you want a lettre, cut the lettres out, and stitch them to the right triangles.

Vlaggetjes-instructie4. Stitch the triangles with right sides facing. Leave the top, where the ribbon will be attached, open. Cut alongside the corners so that you can turn the flags neatly inside out. Turn the flags inside out.

5. Pin the flags to the bias tape. Leave about 4 centimeters of space between the flags. Make sure the bias tape is folded neatly over the top of the flags covering the cut edges.

6. Stitch over the entire length of the bias tape.

[/print_this]
2016-10-30T12:23:05+01:00November 20th, 2015|5 Comments
Go to Top